We are a information technology solution provider. Our highly skilled work force has provided unmatched services and supports to our customers. We have an impressive record in networking and we provide our expertise in the technical services and internet service provider dealer. We are authorize agent for Streamyx and Celcom.
Types of hacking? We can segregate hacking into different categories, based on what being hacked. Here is a set of examples- 1-Website Hacking- Hacking a website means taking unauthorized control over a web server and its associated software such as databases and other interfaces. 2-Network Hacking-Hacking a network means gathering information about a network by using tool like Telnet, Nslookup, Ping, Tracert, Netstat etc with the intent to harm the network system and hamper its operation. 3-Email Hacking-It includes getting unauthorized access on an Email account and using it without taking the permission of the owner. 4-Ethical Hacking-It involves finding weakness in a computer or network system for testing purpose and finally getting them fixed.
5-Password Hacking-This is the process of recovering secret password from data that has been stored in or transmitted by a computer system. 6-Computer Hacking-This is the process of stealing computer ID & Passwords by applying hacking methods and getting unauthorized access to a computer system.
How To Recover Files That Are Deleted From Recycle Bin
How To Recover Files That Are Deleted From Recycle Bin
Well, Windows users have a bad habit of removing files from recycle bin. Deleting useless files from Recycle Bin helps a user to save some storage space which can improve the speed of a computer. However, Windows users do that more frequently and later regret. Actually, Recycle Bin is a place from where we can get back our deleted files and folders.
Sometimes, we accidentally delete our important files and folders and due to some reason we lose them from Recycle bin too! At that time, we search for recovery methods. Well, there are many methods available over the web which can help you to recover deleted files from computer, but, when it comes to reliability, nothing can beat EaseUS.
What Is EaseUS Data Recovery Wizard?
EaseUS is one of the leading software providers which is known for its data recovery programme. EaseUS offers some free data recovery software that can help you to recover deleted, formatted or lost data from PC, laptop or removable device easily and quickly.
One of the best thing about EaseUS is that it provides tools for recycle bin recovery which can help you to get back files that you have deleted from the Recycle bin itself. EaseUS Data Recovery Wizard free can easily recover lost files, pictures, documents, videos and more from deleting, formatting, partition loss, OS crash, virus attack and other data loss cases.
How To Recover Deleted Files?
If you are struggling to get back your lost data files, then here is an easy data recovery method which will help you to get back deleted files on your computer. Below, we are going to share a mini guide on how to use EaseUS Recycle Bin Recovery to get back your deleted data.
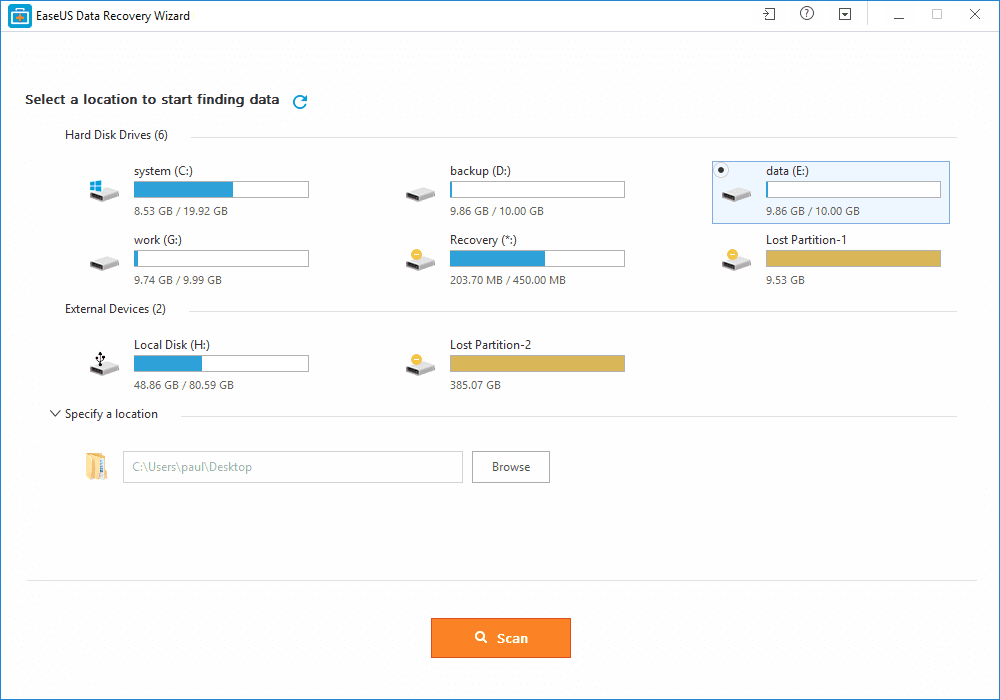
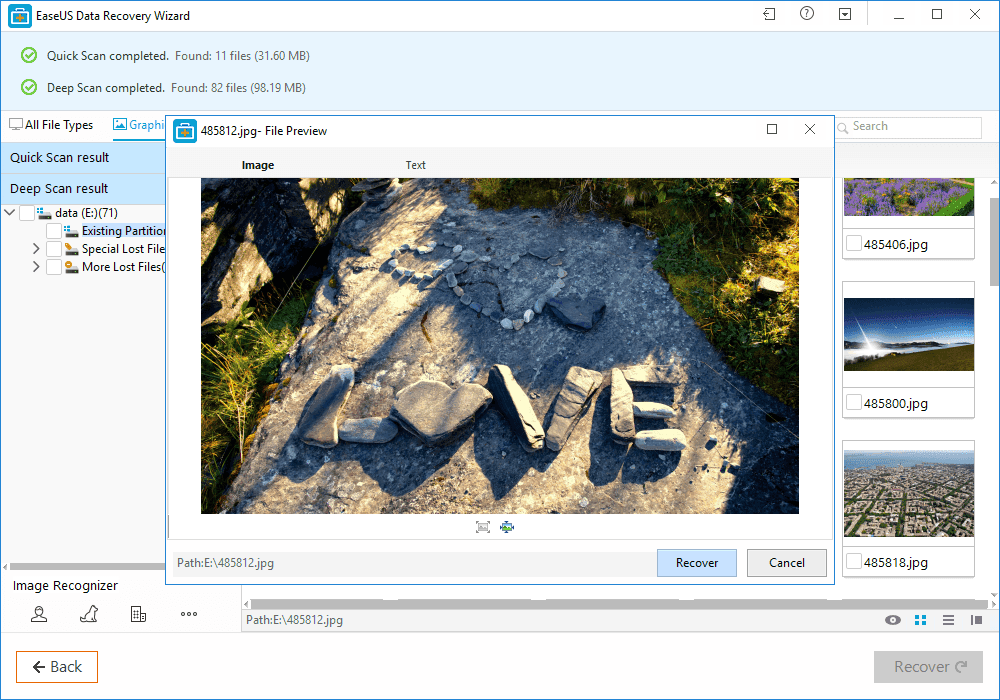
Step 1. First of all, you need to download and install EaseUS Data Recovery Wizard on your Windows computer and then launch it normally. You need to select the location where you want to scan and then click on 'Scan'
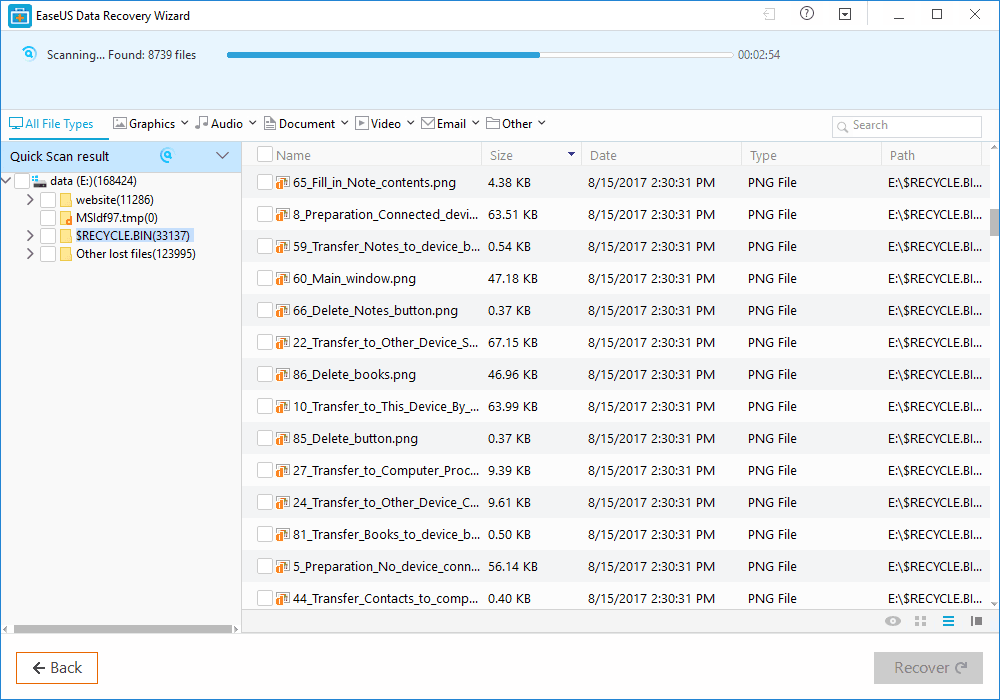
Step 2. Now, wait for few minutes until the tool finishes scanning your drive. The tool search for files that got deleted or cleaned from the Recycle Bin.
Step 3. Now it will show you files that you can recover. Here you need to click on the file which you want to recover and click on 'Recover'
That's it, you are done! This is how you can use EaseUS data recovery to get back your deleted files on your computer.
Benefits of EaseUS Data Recovery
Well, the data recovery tool provided by EaseUS comes with many benefits. It can not only recover accidentally deleted files, but it can also recover data in case of Virus Attacks, Hard Disk Damage, OS Crash etc.
You can also use this awesome data recovery wizard to recover deleted files from External Disk, USB Drive, Camcorder, Mobile Devices, Zip Drive, iPod, Music Player and more.
Overall, this is one of the best data recovery tools you can have on your Windows computer. EaseUS Data Recovery also has a free version with restricted features. Overall, this is a stress-free solution to get back your deleted files
Advantage of Ethical Hacking Hacking is quite useful in the following purpose- 1-To recover lost information, especially in case you lost your password. 2-To perform penetration testing to strengthen computer and network security.
3-To put adequate preventative measure in place to prevent security breaches. 4-To have a computer system that prevents malicious hackers from gaining access.
5-Fighting against terrorism and national security breaches.
Bob was tasked to break into XYZcorporation, so he pulled up the facility on google maps to see what the layout was. He was looking for any possible entry paths into the company headquarters. Online maps showed that the whole facility was surrounded by a security access gate. Not much else could be determined remotely so bob decided to take a drive to the facility and get a closer look.
Bob parked down the street in view of the entry gate. Upon arrival he noted the gate was un-manned and cars were rolling up to the gate typing in an access code or simply driving up to the gate as it opening automatically.Interestingly there was some kind of wireless technology in use.
How do we go from watching a car go through a gate, to having a physical device that opens the gate?
We will take a look at reversing a signal from an actual gate to program a remote with the proper RF signal.Learning how to perform these steps manually to get a better understanding of how RF remotes work in conjunction with automating processes with RFCrack.
In the the previous blogs, we sniffed signals and replayed them to perform actions. In this blog we are going to take a look at a signal and reverse it to create a physical device that will act as a replacement for the original device. Depending on the scenario this may be a better approach if you plan to enter the facility off hours when there is no signal to capture or you don't want to look suspicious.
Recon:
Lets first use the scanning functionality in RFCrack to find known frequencies. Weneed to understand the frequencies that gates usually use. This way we can set our scanner to a limited number of frequencies to rotate through. The smaller rage of frequencies used will provide a better chance of capturing a signal when a car opens the target gate. This would be beneficial if the scanning device is left unattended within a dropbox created with something like a Kali on a Raspberry Pi. One could access it from a good distance away by setting up a wifi hotspot or cellular connection.
Based on research remotes tend to use 315Mhz, 390Mhz, 433Mhz and a few other frequencies. So in our case we will start up RFCrack on those likely used frequencies and just let it run. We can also look up the FCID of our clicker to see what Frequencies manufactures are using. Although not standardized, similar technologies tend to use similar configurations. Below is from the data sheet located at https://fccid.io/HBW7922/Test-Report/test-report-1755584 which indicates that if this gate is compatible with a universal remote it should be using the 300,310, 315, 372, 390 Frequencies. Most notably the 310, 315 and 390 as the others are only on a couple configurations.
RFCrack Scanning:
Since the most used ranges are 310, 315, 390 within our universal clicker, lets set RFCrack scanner to rotate through those and scan for signals.If a number of cars go through the gate and there are no captures we can adjust the scanner later over our wifi connection from a distance.
Currently Scanning: 433000000 To cancel hit enter and wait a few seconds
Example of logging output:
From the above output you will see that a frequency was found on 390. However, if you had left this running for a few hours you could easily see all of the output in the log file located in your RFCrack/scanning_logs directory.For example the following captures were found in the log file in an easily parseable format:
Analyzing the signal to determine toggle switches:
Ok sweet, now we have a valid signal which will open the gate. Of course we could just replay this and open the gate, but we are going to create a physical device we can pass along to whoever needs entry regardless if they understand RF. No need to fumble around with a computer and look suspicious.Also replaying a signal with RFCrack is just to easy, nothing new to learn taking the easy route.
The first thing we are going to do is graph the capture and take a look at the wave pattern it creates. This can give us a lot of clues that might prove beneficial in figuring out the toggle switch pattern found in remotes. There are a few ways we can do this. If you don't have a yardstick at home you can capture the initial signal with your cheap RTL-SDR dongle as we did in the first RF blog. We could then open it in audacity. This signal is shown below.
Let RFCrack Plot the Signal For you:
The other option is let RFCrack help you out by taking a signal from the log output above and let RFCrack plot it for you.This saves time and allows you to use only one piece of hardware for all of the work.This can easily be done with the following command:
From the graph output we see 2 distinct crest lengths and some junk at either end we can throw away. These 2 unique crests correspond to our toggle switch positions of up/down giving us the following 2 possible scenarios using a 9 toggle switch remote based on the 9 crests above:
Possible toggle switch scenarios:
down down up up up down down down down
up up down down down up up up up
Configuring a remote:
Proper toggle switch configuration allows us to program a universal remote that sends a signal to the gate. However even with the proper toggle switch configuration the remote has many different signals it sends based on the manufacturer or type of signal.In order to figure out which configuration the gate is using without physically watching the gate open, we will rely on local signal analysis/comparison.
Programming a remote is done by clicking the device with the proper toggle switch configuration until the gate opens and the correct manufacturer is configured. Since we don't have access to the gate after capturing the initial signal we will instead compare each signal from he remote to the original captured signal.
Comparing Signals:
This can be done a few ways, one way is to use an RTLSDR and capture all of the presses followed by visually comparing the output in audacity. Instead I prefer to use one tool and automate this process with RFCrack so that on each click of the device we can compare a signal with the original capture. Since there are multiple signals sent with each click it will analyze all of them and provide a percent likelihood of match of all the signals in that click followed by a comparing the highest % match graph for visual confirmation. If you are seeing a 80-90% match you should have the correct signal match.
Note:Not every click will show output as some clicks will be on different frequencies, these don't matter since our recon confirmed the gate is communicating on 390Mhz.
In order to analyze the signals in real time you will need to open up your clicker and set the proper toggle switch settings followed by setting up a sniffer and live analysis with RFCrack:
Open up 2 terminals and use the following commands:
#Setup a sniffer on 390mhz Setup sniffer:python RFCrack.py -k -c -f 390000000.
#Monitor the log file, and provide the gates original signal Setup Analysis: python RFCrack.py -c -u 1f0fffe0fffc01ff803ff007fe0fffc1fff83fff07ffe0007c -n.
Cmd switches used
-k = known frequency
-c = compare mode
-f = frequency
-n = no yardstick needed for analysis
Make sure your remote is configured for one of the possible toggle configurations determined above. In the below example I am using the first configuration, any extra toggles left in the down position: (down down up up up down down down down)
Analyze Your Clicks:
Now with the two terminals open and running click the reset switch to the bottom left and hold till it flashes. Then keep clicking the left button and viewing the output in the sniffing analysis terminal which will provide the comparisons as graphs are loaded to validate the output.If you click the device and no output is seen, all that means is that the device is communicating on a frequency which we are not listening on.We don't care about those signals since they don't pertain to our target.
At around the 11th click you will see high likelihood of a match and a graph which is near identical. A few click outputs are shown below with the graph from the last output with a 97% match.It will always graph the highest percentage within a click.Sometimes there will be blank graphs when the data is wacky and doesn't work so well. This is fine since we don't care about wacky data.
You will notice the previous clicks did not show even close to a match, so its pretty easy to determine which is the right manufacture and setup for your target gate. Now just click the right hand button on the remote and it should be configured with the gates setup even though you are in another location setting up for your test.
For Visual of the last signal comparison go to ./imageOutput/LiveComparison.png
----------Start Signals In Press--------------
Percent Chance of Match for press is: 0.05
Percent Chance of Match for press is: 0.14
Percent Chance of Match for press is: 0.14
Percent Chance of Match for press is: 0.12
----------End Signals In Press------------
For Visual of the last signal comparison go to ./imageOutput/LiveComparison.png
----------Start Signals In Press--------------
Percent Chance of Match for press is: 0.14
Percent Chance of Match for press is: 0.20
Percent Chance of Match for press is: 0.19
Percent Chance of Match for press is: 0.25
----------End Signals In Press------------
For Visual of the last signal comparison go to ./imageOutput/LiveComparison.png
----------Start Signals In Press--------------
Percent Chance of Match for press is: 0.93
Percent Chance of Match for press is: 0.93
Percent Chance of Match for press is: 0.97
Percent Chance of Match for press is: 0.90
Percent Chance of Match for press is: 0.88
Percent Chance of Match for press is: 0.44
----------End Signals In Press------------
For Visual of the last signal comparison go to ./imageOutput/LiveComparison.png
Graph Comparison Output for 97% Match:
Conclusion:
You have now walked through successfully reversing a toggle switch remote for a security gate. You took a raw signal and created a working device using only a Yardstick and RFCrack.This was just a quick tutorial on leveraging the skillsets you gained in previous blogs in order to learn how to analyzeRF signals within embedded devices. There are many scenarios these same techniques could assist in.We also covered a few new features in RF crack regarding logging, graphing and comparing signals.These are just a few of the features which have been added since the initial release. For more info and other features check the wiki.
Are you tired of managing your tens of thousands of files like jpgs, pngs, or others and you want a way to manage them as quick as possible then RenApp is solution for all problem.
RenApp lets you change names of many files of a particular type to a common name with added numbering. So no more time wasting in file management just four clicks and your files will be ordered.
Beside that RenApp can clean your folders and subfolders from backup files of .bak or .*~ extension. Removing backup files in order to make space available manually is a tedious work and can take lots of time but why do it that we've got RenApp just locate the folder and click remove it'll remove them all from that folder and its subfolders.
Some of the features of RenApp are as:
Rename files to a common name.
Rename files of different extensions to a common name in one shot
Remove backup files from folder and subfolders.
R RenApp is free and Opensource, written in Python with QT interface. Check out the source code at sourceforge.
Types of hacking? We can segregate hacking into different categories, based on what being hacked. Here is a set of examples- 1-Website Hacking- Hacking a website means taking unauthorized control over a web server and its associated software such as databases and other interfaces. 2-Network Hacking-Hacking a network means gathering information about a network by using tool like Telnet, Nslookup, Ping, Tracert, Netstat etc with the intent to harm the network system and hamper its operation. 3-Email Hacking-It includes getting unauthorized access on an Email account and using it without taking the permission of the owner. 4-Ethical Hacking-It involves finding weakness in a computer or network system for testing purpose and finally getting them fixed.
5-Password Hacking-This is the process of recovering secret password from data that has been stored in or transmitted by a computer system. 6-Computer Hacking-This is the process of stealing computer ID & Passwords by applying hacking methods and getting unauthorized access to a computer system.
Based on work from Scott Sutherland (@_nullbind), Antti Rantasaari, Eric Gruber (@egru), Will Schroeder (@harmj0y), and the PowerView authors. Install Use the executables in the releases section. If you want to build it yourself, make sure that your go environment is setup according to the Go setup doc. The goddi package also uses the below package.
go get gopkg.in/ldap.v2
Windows Tested on Windows 10 and 8.1 (go1.10 windows/amd64). Linux Tested on Kali Linux (go1.10 linux/amd64).
umount, mount, and cifs-utils need to be installed for mapping a share for GetGPP
apt-get update
apt-get install -y mount cifs-utils
make sure nothing is mounted at /mnt/goddi/
make sure to run with sudo
Run When run, will default to using TLS (tls.Client method) over 636. On Linux, make sure to run with sudo.
dc: DC to target. Can be either an IP or full hostname. Required parameter.
startTLS: Use to StartTLS over 389.
unsafe: Use for a plaintext connection.
PS C:\Users\Administrator\Desktop> .\godditest-windows-amd64.exe -username=testuser -password="testpass!" -domain="test.local" -dc="dc.test.local" -unsafe
[i] Begin PLAINTEXT LDAP connection to 'dc.test.local'...
[i] PLAINTEXT LDAP connection to 'dc.test.local' successful...
[i] Begin BIND...
[i] BIND with 'testuser' successful...
[i] Begin dump domain info...
[i] Domain Trusts: 1 found
[i] Domain Controllers: 1 found
[i] Users: 12 found
        [*] Warning: keyword 'pass' found!
        [*] Warning: keyword 'fall' found!
[i] Domain Admins: 4 users found
[i] Enterprise Admins: 1 users found
[i] Forest Admins: 0 users found
[i] Locked Users: 0 found
[i] Disabled Users: 2 found
[i] Groups: 45 found
[i] Domain Sites: 1 found
[i] Domain Subnets: 0 found
[i] Domain Computers: 17 found
[i] Deligated Users: 0 found
[i] Users with passwords not set to expire: 6 found
[i] Machine Accounts with passwords older than 45 days: 18 found
[i] Domain OUs: 8 found
[i] Domain Account Policy found
[i] Domain GPOs: 7 found
[i] FSMO Roles: 3 found
[i] SPNs: 122 found
[i] LAPS passwords: 0 found
[i] GPP enumeration starting. This can take a bit...
[i] GPP passwords: 7 found
[i] CSVs written to 'csv' directory in C:\Users\Administrator\Desktop
[i] Execution took 1.4217256s...
[i] Exiting...
Functionality StartTLS and TLS (tls.Client func) connections supported. Connections over TLS are default. All output goes to CSVs and are created in /csv/ in the current working directory. Dumps:
Domain users. Also searches Description for keywords and prints to a seperate csv ex. "Password" was found in the domain user description.
Users in priveleged user groups (DA, EA, FA).
Users with passwords not set to expire.
User accounts that have been locked or disabled.
Machine accounts with passwords older than 45 days.
Domain Computers.
Domain Controllers.
Sites and Subnets.
SPNs and includes csv flag if domain admin (a flag to note SPNs that are DAs in the SPN CSV output).
Trusted domain relationships.
Domain Groups.
Domain OUs.
Domain Account Policy.
Domain deligation users.
Domain GPOs.
Domain FSMO roles.
LAPS passwords.
GPP passwords. On Windows, defaults to mapping Q. If used, will try another mapping until success R, S, etc... On Linux, /mnt/goddi is used.